Where to Find Keurig Descaling Solution
Although the most enthusiastic and dedicated home baristas and coffee lovers might shudder and wince at the very thought of using pod coffee systems, few can deny the convenience of making your morning cup of joe with a Keurig coffee making machine.
Indeed, these popular brewers are often a kitchen staple, prized for their ability to keep up with your coffee habit quickly. No, the cups of coffee they produce aren't as flavorful as those made from, say, a pour-over or French press, but if all you're after is getting a decent cup quickly, they can't be beat — until it's time to clean them.
The Keurig cleaning process can be a bit time-consuming and tedious, but it isn't difficult. While that may be true, you can't skip it! Descaling your Keurig is the only way to keep your cup of coffee tasting great and your machine brewing for years to come, and we're going to help you figure out the best way to get the job done.
It's prime time…oh no
Keurig's units are generally very reliable, but one issue afflicts them from time to time: the dreaded Prime message. That pesky little alert usually pops up when there's an issue with the machine's water reservoir.
You might want to start hurling insults at the machine when you see this message, especially when it's the only thing standing between you and delicious coffee. But before you start throwing a fit, you should know that this and most other brewing failures result from a lack of basic maintenance. Yep, we're looking at you, descaling skippers.
We've got an article detailing how you can banish the Prime error message here, but the best way to prevent such problems from occurring in the first place is to descale your home brewing machine regularly.
The Details on Descaling
Descaling removes limescale, calcium, and other water minerals that have built up in your brewer over time, and it's crucial if you plan on continuing to use your Keurig to curb your coffee cravings in record time.
Limescale buildup is the scourge of many kitchen appliances, including kettles, irons, and coffee machines, and mineral accumulation can leave your brew tasting unpleasant before eventually causing the device to fail. And unfortunately, these things can occur even if you only use filtered, fresh water in your brewer.
How often should you descale your Keurig?
Ideally, you'll go through your descaling routine every two to three months, more if your machine is used very frequently. If you live in an area with hard water, you'll need to descale your Keurig more regularly, as your tap water contains more limescale.
It can be challenging to remember when it's time to get cleaning, which is why many Keurig coffee brewers have an automatic descaling reminder built into them. If your unit doesn't have this function, though, make a note on your calendar so you don't forget!
Descaling Solution vs. Vinegar
Two cleaning agents have proven effective in removing mineral and scale buildup from Keurig coffee machines: Keurig's branded descaling solution and vinegar. And when we say vinegar, we specifically mean white vinegar; keep your malt vinegar for your French fries and the balsamic or apple cider vinegar for your salad.

You probably already have a bottle of vinegar in your kitchen cupboard, but if you don't, you can easily find it at any supermarket or grocery store. You can even buy it online if you prefer. Keurig's descaling solution is also available in-store or online, and it's formulated specifically for use with the brand's machines, so you know it's a safe choice for a cleaning cycle.
Although Keurig's descaling agent is more expensive than white vinegar, the brand says it can be used for more than just the descaling process. You can also use it to clean other kitchen items, like kettles and water heaters, not to mention it extends the life of your machine. So, it's pretty safe to say it's worth a few extra dollars.
But which one works best?
Before we can answer that question, we should walk you through each process. Then, you can make an informed decision on which solution is best for ridding your machine of calcium and mineral buildup and keeping it running smoothly.
Descaling With A White Vinegar Solution
Let's look at the home remedy, the white vinegar option, first.
While this is the cheaper option, it's also worth noting that if you ever need to use Keurig's warranty to fix a problem with your machine, the company might not be too happy that you've been relying on vinegar rather than the brand's specially formulated descaling product to keep your device at peak performance.
What You'll Need:
- Dish soap
- White vinegar
- Clean water
- Clean, dry cloths
What To Do:
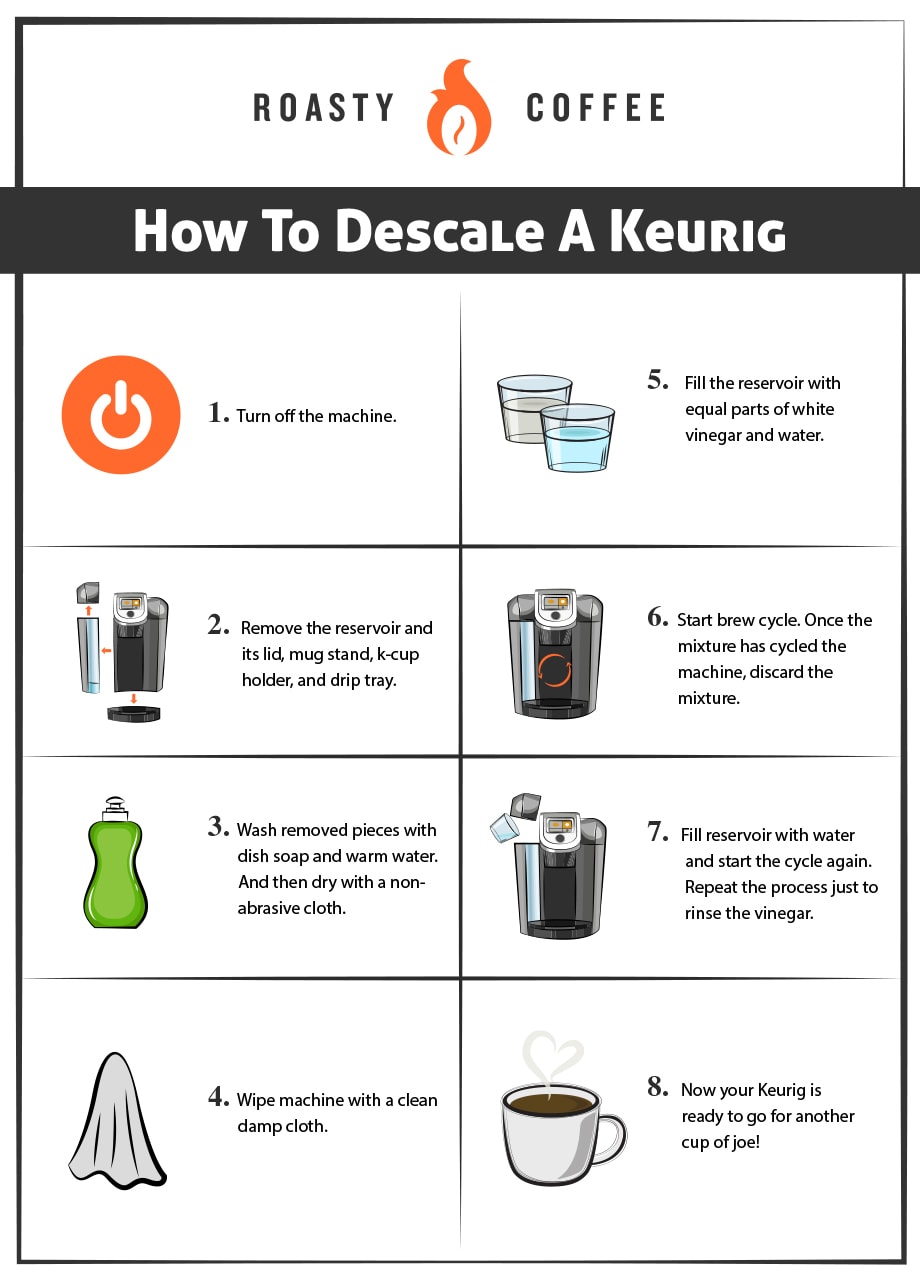
- Turn off the machine. Better still, unplug the appliance from the wall socket. (We care about your health and safety here at Roasty).
- Remove the coffee machine reservoir and its lid. Take off the mug stand and the K-Cup holder. If your machine has a removable drip tray, remove that too.
- Wash all the pieces you've removed in dish soap and warm water. Then, wipe the parts dry with a clean, non-abrasive cloth.
- Wipe down the rest of the machine's surfaces with a clean, damp cloth. Remember to clean the area around the pod holder, too, as a small amount of gunk and spilled coffee grounds can accumulate here. Now, you can replace all the removable pieces and plug the machine back into the wall.
- Fill the reservoir halfway with white vinegar and top it off to the fill line with clean water.
- Place a mug in position and start the brew cycle, but don't insert a K-Cup. Repeat this process until the reservoir is empty, dumping the contents out after each cycle. Circulating vinegar and hot water through the machine breaks down any accumulated limescale and mineral deposits.
- Once all the vinegar and water mixture has cycled through the machine, fill the reservoir with water, hit the brew button again, and repeat the process. Rinsing with water keeps your joe from tasting like vinegar. Now, your Keurig is ready to brew a cup of coffee, tea, hot chocolate, or whatever else you love to make with your machine!
How do I get the vinegar taste out of my Keurig after cleaning it?
If a water-only cleaning cycle doesn't quite do the trick in removing the vinegar taste from your machine, run a reservoir full of water and a tablespoon of baking soda through the brewer, then give your machine at least a 30-minute rest before trying to make coffee.
Descaling With Keurig's Solution
The procedure for descaling your brewer with Keurig's solution pretty much follows the same simple steps as above, except you'll substitute the vinegar for the descaling solution. Consult your machine's instruction manual or the directions on the solution's bottle to see how much of the product you should pour into the reservoir.
You can use Keurig's descaling product with automatic machines, manual machines, pod and K-Cup machines, and commercial brewers, too.
Reviews from other coffee aficionados declare you get a superior flavored coffee if you use this stuff instead of vinegar, so if you want to brew coffee that tastes as fresh and delicious as possible, this is probably your best bet.
Answering Your Keurig Cleaning Questions
Do you have to clean your Keurig if there is already a water filter?
Yes, you and your Keurig coffee machine still have to undergo the descaling process even if there is already a water filter.
Many Keurig coffee makers have built-in water filters, but these don't excuse you from regular cleanings with some sort of descaling agent. In fact, they add an extra step to your Keurig maintenance routine, as these water filters should be replaced every two months (though this could vary depending on how often you use your brewer).
Can I put my Keurig parts in the dishwasher?
You'll have to consult the user manual that came with your coffee maker to see which parts, if any, of your specific brewer are dishwasher-safe. In general, the water reservoir, drip tray, and K-Cup holder can survive a low-temperature cycle on the top rack of the appliance.
If the water is too hot, though, there's a chance of the plastic components melting, so if you don't want to take that risk, just use warm, soapy water and a washcloth to scrub each part of the coffee machine by hand. Generally, we recommend hand-washing all parts of your Keurig; it's the best way to make sure nothing's left behind in any of your brewer's hard-to-reach places.
What happens if you don't descale your Keurig?
It might be tempting to skip out on descaling your Keurig but trust us, taking a few extra minutes to make sure everything's clean is worth it. Descaling guarantees your machine will consistently give you the best-tasting coffee possible, as it keeps calcium deposits from building up and clogging your machine. The more calcium and other water minerals build up in your machine, the less efficiently your Keurig will run, and pretty soon, you'll have to invest in a brand new brewer.
To put it plainly: descaling your Keurig prolongs its life and spares you from having to suffer through cups of off-tasting coffee.
Is Keurig descaling solution toxic?
While the cleaning solution is safe enough for use in your beloved single-serve coffee maker, it can be harmful if it's swallowed, inhaled, or makes contact with your skin. However, symptoms and reactions could be delayed, so your best bet is to seek medical advice right away if any of these things happen. Use it only for its intended purpose and follow the instructions carefully, though, and you should be fine.
The Bottom Line
In summary, each brewer descaling solution has its own set of pros and cons; it's up to you to decide which is best for you.
White vinegar is probably your best bet if you want something cheap and readily available in a pinch. However, the long-term effectiveness of this method isn't quite as impressive.
Keurig's descaling solution is more expensive than vinegar. But, since it's formulated by and for Keurig, you can trust that it will keep your machine running reliably if you use it at the recommended every two to three months.
Though the process is pretty much the same whether you use white vinegar or Keurig's solution, we'd recommend using Keurig's product over vinegar. Sure, it's a little more expensive to buy, but if it helps you enjoy a better coffee flavor, we think it's worth the investment. Plus, your machine won't fail because of that Prime error message, and your warranty will remain valid in the unlikely event of a problem down the road.
Happy Caffeinating!
Where to Find Keurig Descaling Solution
Source: https://www.roastycoffee.com/keurig-descaling-solution-vs-vinegar/